Measuring arms – 10 tips for becoming an expert user
Measuring arms are widely used for applications as varied as reverse engineering, quality control, or rapid prototyping, and the quality of these portable systems is clear. However, some factors can influence the quality of data from measuring arms – the working environment, the operator, the organization of tasks.
Kreon gives 10 tips to get the best results from your measuring arm.
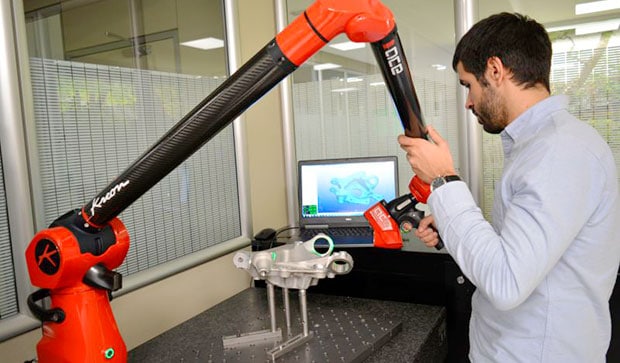
Do not force the limits of the arm, do not force the measuring arm
When the tubes of the arm are completely extended, the arm reaches its working limit. If the user forces the arm to try to reach beyond this limit, there is a risk that it will make incorrect measurements or even damage the arm. To compensate for this misuse, the Ace arm prevents the measurements from nearing the mechanical limits of the arm. The 2, 4 and 6 axes of the arm are therefore equipped with mechanical and software stops.
Use a stable support, securely tighten the attachment to the base of the measuring arm
The base of the arm must be securely fastened to ensure high accuracy measurements. The attachment of the arm at the foot of the base must therefore be securely tightened with the key provided for this. Furthermore, the support onto which the arm is fixed must be rigid and stable. Obviously the same rules apply to the fastening of the parts. Ideally, the arm and the part are fixed together on a very rigid metrological support like a marble. A meeting table or desk will never provide the best possible results.
When the part is too large, think Leap Frog
When a part is too large to be within the working volume of the arm, it is possible to move the arm one or more times to measure the whole part. Each new position of the arm must be accompanied by reference points (on spheres or cones) to align the arm to its previous position. This movement of the arm, achieved while preserving the measurement references, is the Leap Frog. Users should take into account the inaccuracy of repositioning induced by each Leap Frog.
Keep the measuring arm clean
The measuring arm is a metrology tool, it must be stored and used in clean conditions. Probe connectors must be kept clean to prevent the clogging, jamming or even breaking of one of their pins. The camera glass of the scanner should be cleaned and cleared of dust and fingerprints. The cleanliness and good condition of the ball will also be monitored. Generally, when the arm is not in use, it is advisable to cover it with its protective cover.
Monitor the position of the elbow, avoid the risk of collision
The elbow of the arm (axis 4) is very mobile. Under certain conditions of use, especially when controlling hard-to-reach areas, the arm’s elbow sometimes collides with its surroundings. Generally without consequence, this incident can cause the wear of some parts and more rarely the decalibration of the arm. Only the vigilance of the user and user experience can avoid these collisions.
Be stable and do not move the probe during measurement
Not moving during measurement seems obvious. Unfortunately, on some very slippery materials, it is sometimes difficult to stick to this basic rule. A small trick is to hold the probe against the part between your thumb and forefinger. This should not be used systematically because the heat of the fingers influences the result of the measurement. Before working, the operator will check that nothing will prevent moving around the part, and that he will be able to stand in a stable position for each measurement.
Calibrate the probes regularly
Probes are highly accurate 3D measurement tools. The slightest calibration defect of a probe affects each measurement. During prolonged and regular use of the arm, it is therefore strongly recommended to calibrate the probes regularly. Furthermore, it is not recommended to strongly press the probe against the part.
Check the accessibility of the areas to be measured before starting the measurement
When controlling a part almost as large as the measurement volume of the arm, the position of the tripod can be critical to the success of the measurements. Choosing the right position sometimes helps to avoid a Leap Frog, reaching cavities that are difficult to access, or simply improving the comfort of the operator. Once the position is chosen, before taking measurements, systematically check with the arm the accessibility of the areas to be measured.
Regularly perform a precision test of the arm (ball bar or toothed bar)
The measuring arm is a complex tool which is sometimes very much in demand by the environment in which it operates. To be confident in its measurements, and to produce quality measurement reports, the arm must be checked regularly. A ball bar or a toothed bar will check the characteristics of the measuring arm.
Keep the arm at room temperature
The measuring arms are portable CMMs and can be used both in workshops, in design offices and in metrology rooms, as well as outside. However, a measuring arm that has undergone a sudden temperature change should not be used immediately. For example, an arm stored in a cold area will have to wait to be used in metrological room, the operator will then have to control the internal temperature of the arm and wait for it to stabilize for stricter controls.
Bonus – Avoid tilting the elbow of the arm
Tilting the elbow of the arm from one side to the other can cause small measurement discrepancies. If you do not need to do this, keep the arm elbow on the same side during the entire measurement process. In this configuration, the accuracy of the arm is much better than that indicated in its specifications. Furthermore, where possible, try not to vary the probe directions too much when measuring a geometric feature. Another great way to increase arm precision.
For more info about Kreon measuring arms please click here
If you want a product demo, please fill in the form:


